
Micah is a Generator member that has been kind enough to share his process. Check it out!
Some of you may remember I kinda get into making halloween costumes. This year I decided to make a “dark Link” Zelda costume for a friend’s themed halloween party
The sewing for the tunic, hat, etc was probably the most complex (and fun) part, but the shield was probably the most classic maker-ish part so I’ll show that here.
First, EVA foam is amazing. People into costuming all seem to know this, but it was new to me. It is a go-to material for the cosplay community and youtube is just littered with great tutorials and examples of complex projects. There’s a great instructable that gives an overview of cutting, gluing, shaping and painting this foam. And I never tried putting it down on the laser cutter, but there are tons of prepared pattern files available for pepakura (3d paper folding) that can give you a boost creating very complex shapes.
My shield was much more simple, but here’s a quick walkthrough.
The first thing was to buy some foam. I got six 2×2′ interlocking floor mats for $23 on amazon.
Then I cut out a simple shape. Nothing special here – I think i eyeballed the shape and just took a guess where the notches should go.

Then I did a little shaping. If you use a heat gun to warm the foam and roll it over a hard smooth object, you can impress a nice dome shape into it. I ended up taking the ball hitch off our car and locking that in a vice – weird, but it worked like a charm.

Look how nicely it holds it’s shape:

A little superglue does a great job at high-stress points like these seams:

A side note – although EVA is very stable and doesn’t really off-gas anything significant I did notice that when I put the heat gun over the super glue something nasty evaporated. The glue blistered white and my nose burned a little. I avoided doing that any more..

The glued-up seam was somewhat puckered above the plane of the rest of the shield. I trimmed down the foam with my primary cutting tool – an extendable box cutter – and sanded the foam down flat.


Modge Podge is a great tool with this foam as well. After sanding I put a coat down and it behaved very much like the first coat of varnish on wood – it raised up the tiny torn fibers of the foam and hardened them. That made it very easy to do a second sanding, which put a very nice smooth finish on the areas that I had trimmed previously. It’s also great for putting a shine on the foam.


I cut an outter edge for the sheild. Obviously it didn’t lay very flat against the shaped shield. (But you can see the contrast between the edge and the shield that has been modge poged’.)

But I still had my heat gun for shaping:

That’s a decent fit, even without any glue. I used a low-temp glue gun to attach the edging and it did the trick nicely.


There are a few raised elements on the shield so I cut those out of scraps. I did it free-hand and it took me a few tries to get shapes I was totally happy with, but since they all had beveled edges this was probably the most efficient approach. If I had thought of it, I totally would have tracked down that 45 degree matt cutter I have somewhere for matt board. Instead I went for the trial and error approach. Meh.


Once the edges and raised elements were glued down, I went over everything with paintable caulking and created smooth, rounded transitions. It took 2-3 coats with sanding in between for me to be happy with the texture because I was really hoping to put a metallic finish on this thing.

This is another cool thing you can do with this foam. I cut a shallow design on the face of the foam and then ran the heat gun over it. The foam will pull away from the cut and give you a nice, clearly defined engraving.

I don’t have a photo of that, but here I am doing the same thing on forearm armor. You can see the difference between the etched lines on the left. Also, the heat gun seals up the foam and puts a gloss on the foam.

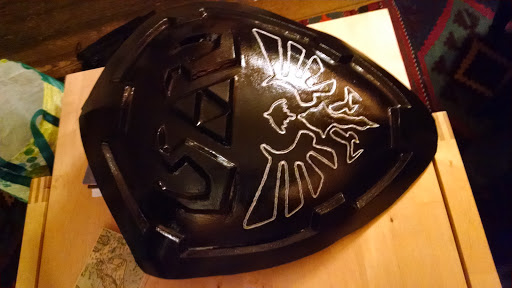
The finishing wasn’t too tricky. I used a can of Plasti Dip Spray first. It goes on thick and smooths over any small cuts or surface inconsistencies. At that point I could have put a high-gloss coat of spray paint down, but I think I ended up just using another coat of modge podge which worked nicely. Notice from this point on you really can’t see any of the seams at all.

I put a little metalic silver paint over the design and attached some straps to the back with super glue. I might go back and add a little more silver detailing somewhere around the edge, but this is what I took to the party.

The finished costume was pretty great. All in all, it took two full weekends and some weeknights to complete – with some trial and error learning beforehand. I learned a lot this year about sewing, face paint and obviously foam. Also I discovered that they make contact lenses that glow in UV light and since this party just happens to have a black light in the kitchen I figured why not (contacts are about $25 per pair quick and easy to get online).
